
Pyramid logo
Career related resources
Student documents
- What are biofuels?
- Why is it so difficult to create cellulosic ethanol?
- Introduction to enzymes
- Aqueous ammonia pretreatment + experiment
- Sample data
What materials are needed
For Pretreatment
- Hot plate set to 60°C, or same 50°C water bath for hydrolysis •250mL Erlenmeyer flask with stopper
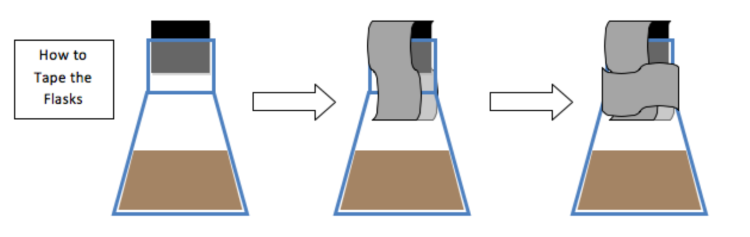
- Duct tape
- 5 g of each feedstock sample (dried, cut or chopped)
- 15 wt% aqueous ammonia solution (NH4OH) (15g NH3 in 100g total solution) •Maintain a 1:9 Solid : Liquid Ratio (1g solid : 9g liquid = 10g total weight)
For Enzymatic Hydrolysis
- 50°C water bath
- Optional – Large beaker, stir bar, clamp and stand
- pH probe
- Burette
- Concentrated hydrochloric acid (HCl) – make sure you wear gloves and splash goggles! •Cellulase enzyme (see information below)
For Fermentation
- 37°C water bath •Cheesecloth
- pH probe
- 125mL flasks with stoppers •Duct tape
- Brewer's Yeast (1.75g per flask)
For Cellulase enzyme
Buy enzymes from a chemical company, for example: Sigma: 50mL = $67.00 - C2730 Sigma Cellulase from Trichoderma reesei ATCC 26921
or ask Genencor donate some “Accelerase" enzyme. These are in solution. Genencor, A Danisco Division
925 Page Mill Rd., Palo Alto, CA 94304
phone: 650-846-7645 fax: 650-845-6524
What are the steps
Use proper safety equipment--goggles, gloves, apron.
Pretreatment (50mL):
1. Set a hot plate at 60°C or preheat the water bath to 50°C.
2. Weigh out 5g of feedstock sample into a 250mL flask.
3. Add 45g of 15wt% aqueous ammonia (NH4OH) (all steps involving ammonia must be done in the fume hood).
4. You can try to mix using a stir bar on a heated stir plate, but the slurry may be too thick for this.
5. Place the stopper in the flask and duct tape the stopper down.
6. Place on hot plate or in water bath. Allow the reaction to proceed for 24hours.
break point: 45 or 90 minute lesson plan
Enzymatic Hydrolysis (100mL):
- Preheat the water bath to 50°C.
- Note: Mixing is important for both hydrolysis & fermentation. Ideally, add water to a beaker that is large enough to hold the flask. Heat this water on a stir plate to 50°C and add a stir bar to the hydrolysate. Use a clamp and stand to support the flask in the beaker, close enough to the stir plate to allow for mixing. Do not place the flask directly on the hot plate. If you cannot do this, it's more important to maintain the correct temperature than it is to stir.
- Remove the tape and the stopper – perform all of the following steps in the fume hood.
- Place a pH probe into the slurry (record the pH) and continuously monitor the pH for the next few steps.
- Add 30mL of water to the flask and swirl gently to mix.
- To neutralize the solution, fill a buret with HCl. Either while stirring with a hot plate, or swirling the mixture every so often, slowly add HCl to the slurry until the pH is between 4.8 – 5.0.
- Subtract the volume of HCl added from 20mL and, using this amount of water, rinse off the pH probe into the flask (HCl + water=20 mL). a. The final solids concentration of your hydrolysate should be ~5g solids /100g total weight of solution for each flask.
- Stopper the flasks, seal with duct tape, and place in a 50°C water bath. After 10 minutes, add 3mL of cellulase enzyme to each sample. Restopper and tape the flasks.
- Allow the hydrolysis to run for 72 hours.
break point: 45 or 90 minute lesson plan
Fermentation (50mL):
- 1. Heat the water bath to 37°C.
a. See the previous note in the hydrolysis section. - Filter the hydrolysate through 2 – 10 layers of cheesecloth. Try to remove as much of the solids as possible.
- Measure the pH of the liquid. (It should be between pH4.5 – 5.5 for adequate yeast fermentation).
- Transfer 50mL of hydrolysate into a clean 125mL flask (sterilize the flask if possible).
a. If adding a stock solution of yeast, you can either decrease the amount of hydrolysate or add it to the 50mL – but remember the sugar concentration will change. The final amount of yeast in the flask should be at the concentration of 3g/100mL of liquid. - Dissolve 1.75g yeast in hydrolysate and control solution (make sure the temperature is between 35-38°C).
- Conduct the fermentation at 37°C under anaerobic conditions. (Stopper & tape the flasks.)
- Observe gas formation, recording observations. a. Normally our fermentation experiments run for 72hours. This isn't necessary for these experiments, but you could observe them for a few hours, making observations every 10-20 minutes or so and then leave them for 12 or 24 hours and observe them at the final time point. b. To provide actual CO2 measurements, connect the flasks with tubing to a eudiometer and measure water displacement, or build a mini-fermenter and use a CO2 probe to quantify fermentation rate (see GLBRC educational materials page for directions).
Frequently asked questions
Can you explain what you mean by 15wt% aqueous ammonia? Ammonium hydroxide solutions are generally sold as wt%, not molarity. The standard concentration if you purchase from a chemical company is 28-30wt%. It would be possible to just use this concentration as is, without diluting to 15wt%. But if wanted to use the dilution: in the original sample, at ~30wt%, you would have 30g NH3 in 100g of solution. So to get ~15wt%, you would just mix an equal weight (volume) of water and ammonium hydroxide solution (30g in 200g solution 15g in 100g solution).
Does the feedstock sample need to be prepared before using? Use dry feedstocks, chopped or cut. You can use sawdust, woodchips (like rodent bedding), grass clippings, and paper punch holes. Or you can use scissors or a paper cutter to cut up grass or paper to specific sizes. One possible experiment could be to look at the effect of different particle sizes on the results. (2 inch lengths, 1 inch lengths, 0.5 inch lengths, etc...) You can use powdered biomass, but if you do, I would recommend cutting the time for pretreatment in half (unless you're comparing pretreatment sizes in which case the length of time should be held constant). The pretreatment and hydrolysis will be extremely effective on powdered materials.
Reference: Great Lakes Bioenergy Research Center - www.glbrc.org/education
Learn more by doing
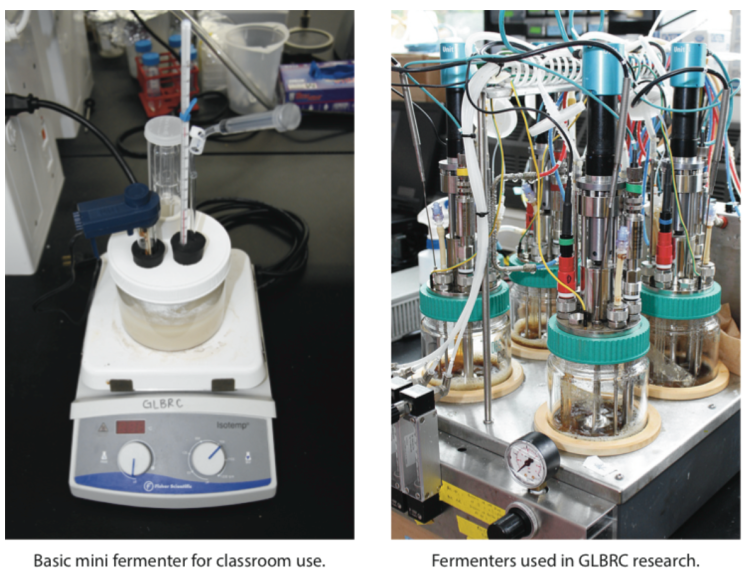
This mini fermenter can be used to conduct small-scale fermentation investigations ordemonstrations similar to research done by GLBRC scientists. The design allows for students to use simple techniques and classroom-grade probes to collect data during fermentation on a range of variables, such as ethanol concentration, CO2production, temperature and pH. The complete mini fermenter can be built with readily-available supplies for approximately $20 (detailed supplies list included with instructions).
